awesome! How to apply it to blocs?
Go to the particle.js site, use the input controls on the right side of the page to set the parameters you desire. Use those generated parameters along with the provided setup and usage instructions for the library to implement it in Blocs.
So for example:
1.) Give your Bloc the proper ID and set the padding etc., as you desire:

2.) Input the needed script and setup code in the Page Settings:
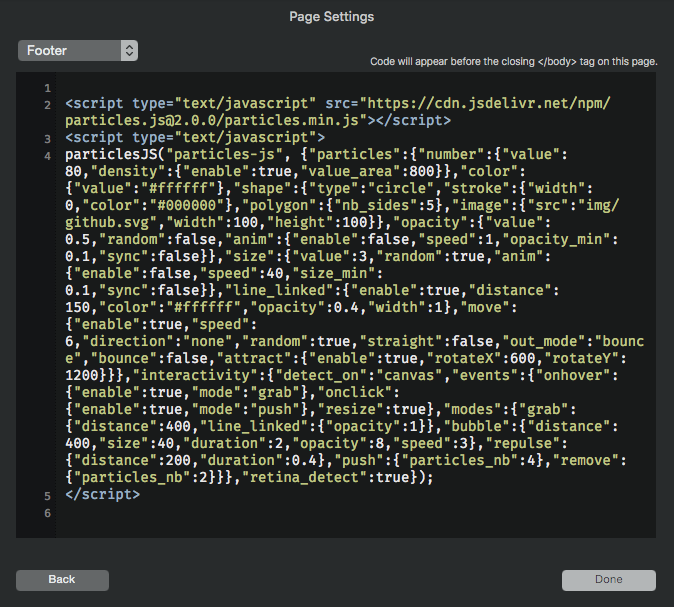
Below for example is the above script and code used in the screenshot.
<script type="text/javascript" src="https://cdn.jsdelivr.net/npm/particles.js@2.0.0/particles.min.js"></script>
<script type="text/javascript">
particlesJS("particles-js", {"particles":{"number":{"value":80,"density":{"enable":true,"value_area":800}},"color":{"value":"#ffffff"},"shape":{"type":"circle","stroke":{"width":0,"color":"#000000"},"polygon":{"nb_sides":5},"image":{"src":"img/github.svg","width":100,"height":100}},"opacity":{"value":0.5,"random":false,"anim":{"enable":false,"speed":1,"opacity_min":0.1,"sync":false}},"size":{"value":3,"random":true,"anim":{"enable":false,"speed":40,"size_min":0.1,"sync":false}},"line_linked":{"enable":true,"distance":150,"color":"#ffffff","opacity":0.4,"width":1},"move":{"enable":true,"speed":6,"direction":"none","random":true,"straight":false,"out_mode":"bounce","bounce":false,"attract":{"enable":true,"rotateX":600,"rotateY":1200}}},"interactivity":{"detect_on":"canvas","events":{"onhover":{"enable":true,"mode":"grab"},"onclick":{"enable":true,"mode":"push"},"resize":true},"modes":{"grab":{"distance":400,"line_linked":{"opacity":1}},"bubble":{"distance":400,"size":40,"duration":2,"opacity":8,"speed":3},"repulse":{"distance":200,"duration":0.4},"push":{"particles_nb":4},"remove":{"particles_nb":2}}},"retina_detect":true});
</script>
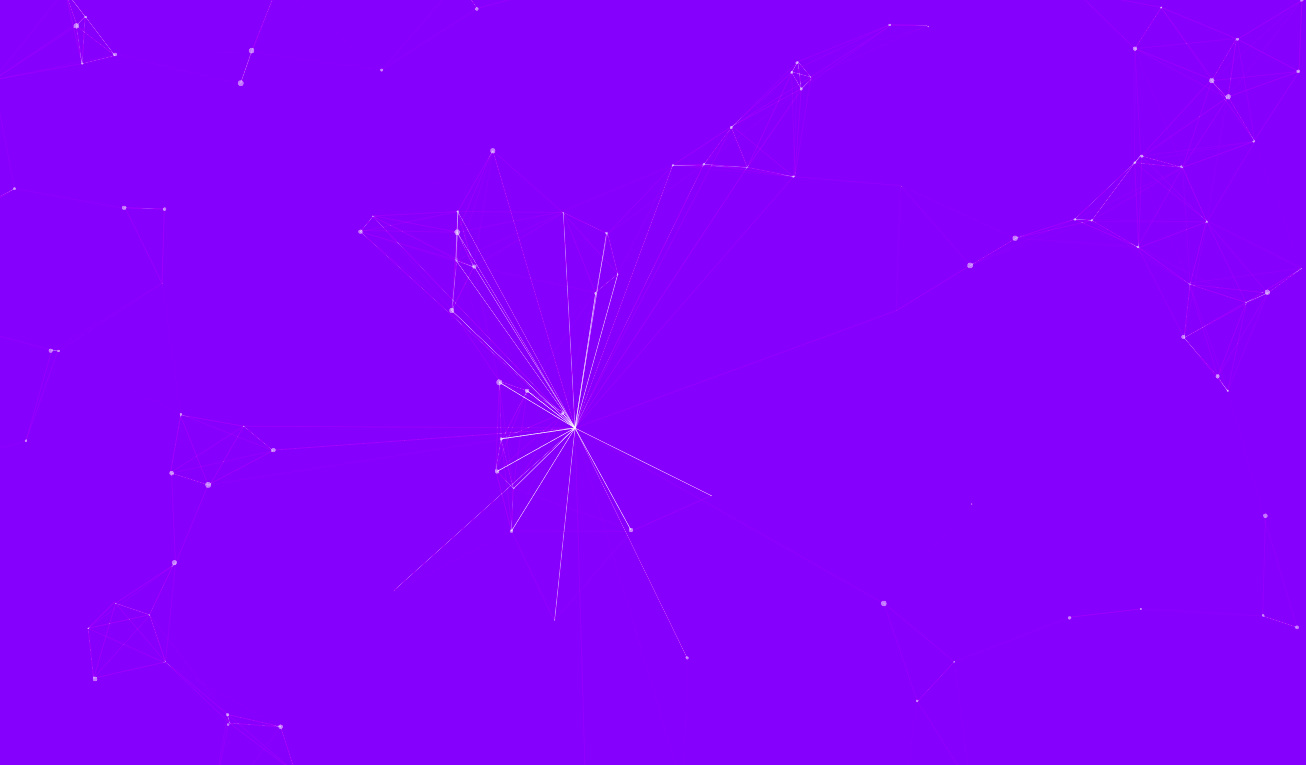
3.) Adjust any settings until you get the result you want:
The same holds true for anything you want to implement in Blocs concerning 3rd party libraries or plugins. For any of these you find and wish to implement in Blocs, just follow the usage and setup instructions which are generally provided.
Here are some Blocs 3 documents which should help you whenever you want to implement a 3rd party library or plugin. For each library or plugin you want to implement use these along with the corresponding provided usage and setup instructions the libraries or plugins come with.
- Classes & ID’s – Custom Classes Basics – Blocs – User Documents
- HTML Bric – Code Widget – Blocs – User Documents
- Page Setting - Add Code – Page Settings – Blocs – User Documents
- Page Attachments – https://help.blocsapp.com/knowledge-base/page-attachments/
- Custom Data Attributes – https://help.blocsapp.com/knowledge-base/custom-data-attributes/
3 Likes
Thanks a lot! I will look into this when I get home! Will let you know! 
Im trying to make this one also for the home page
https://turinginc.io
By the way do you know how to write vertically? Like this

That does not answer if you got the above provided particle.js method working in Blocs? Regarding vertical text, that has nothing to do with this thread. So I instead responded in the thread you made about it.
To be honest I haven’t figure out how to do it! Im not very advanced on blocs but I will do it hehe! im trying how to get the background in a different color cause is in red when I download the file 
With the example provided above, you would just set the background in Blocs by way of the Side Panel > Background > Color. Make it whatever you want.
 I think Im doing something wrong!
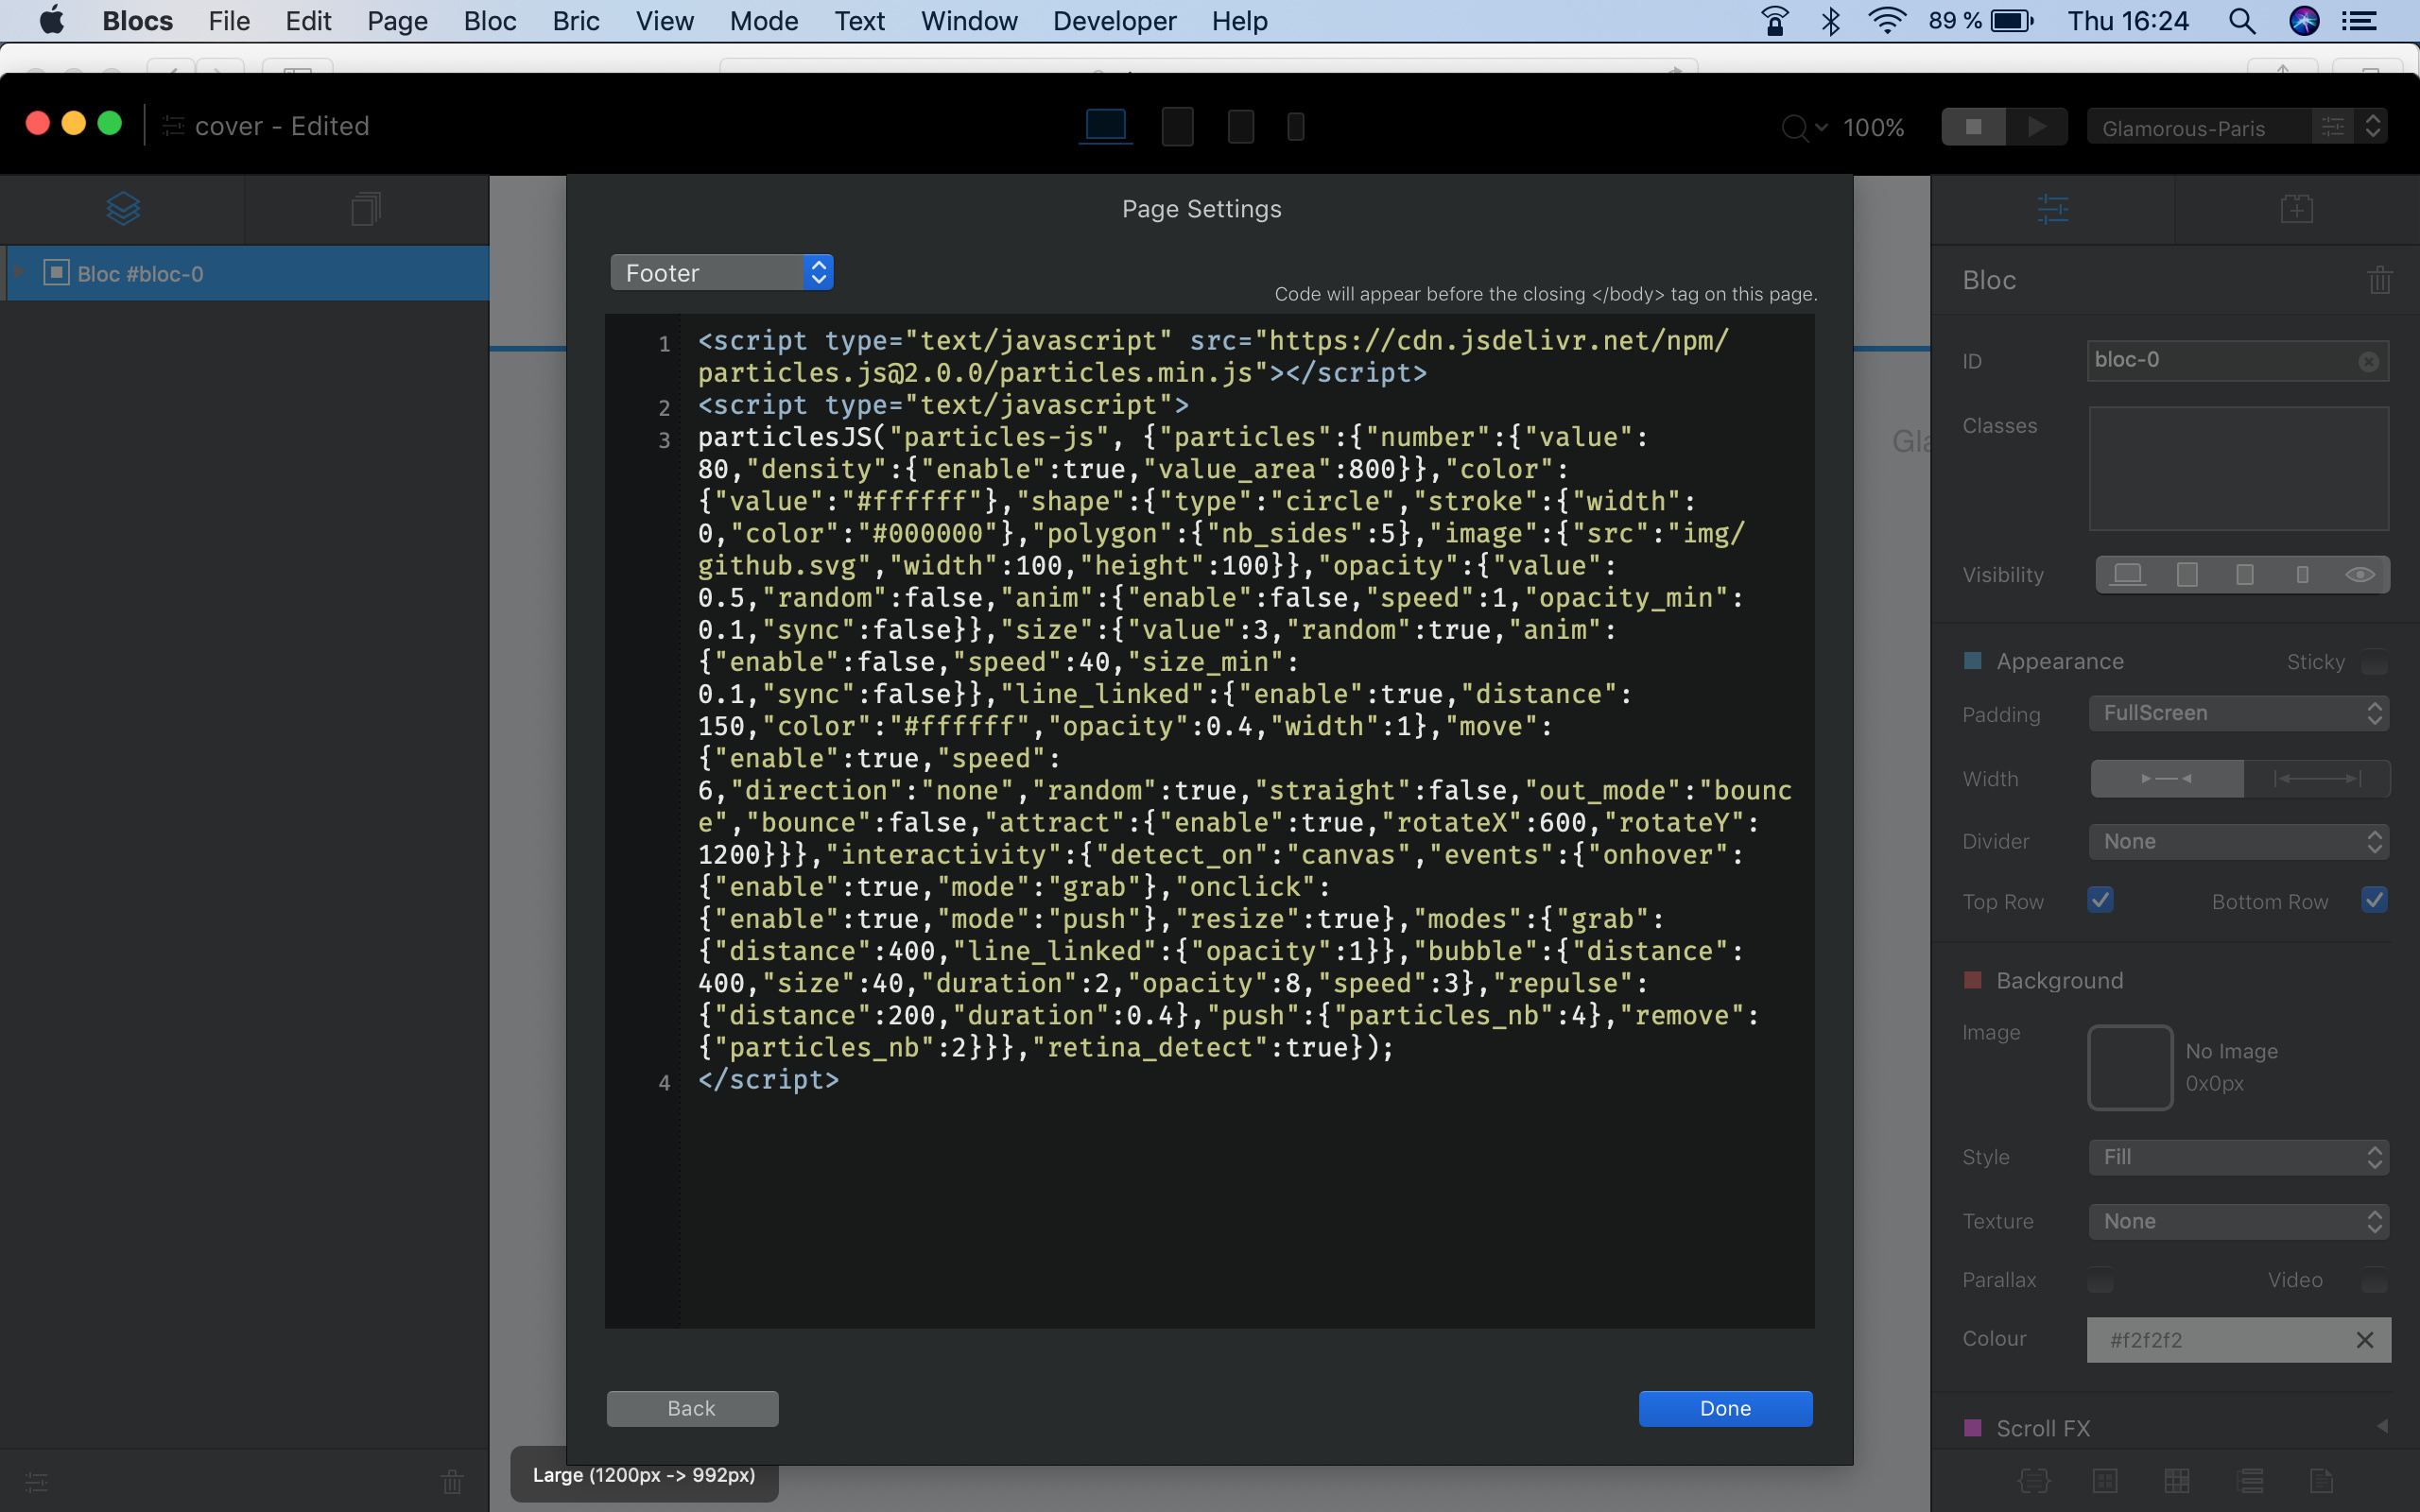
See step #1 above, you need to give your Bloc an ID, as shown of ’ particles-js ', currently you have it as the default ID of ’ bloc-0 '. Or change the particles-js reference in the script to bloc-0 or whatever you want the name to be so it correlates between the two instances.
Also preview in browser for it to work, I don’t have Blocs 3 in front of me so I’m not sure it works in its preview?
Still not working! Ok Im doing this and placing the particles-js folder on my hosting right?
No the only thing you need to do is the steps outlined above. It pulls the needed library from a CDN. So if you are connected to the internet and view the preview or the export in a browser it should work correctly as demonstrated above. The same holds true once uploaded to your server. I’ll check back later but it should work without issue, if you follow all that was discussed above.
I followed everything but didn’t work! Do you know how to do the other one with the text?
Following your steps and doing a copy/paste of your code does work. In fact, I even get my own custom-generated code (with custom SVG) to work too. HOWEVER, all my Blocs content inside that Bloc gets thrown to the LEFT, and the Particle animation plays on the RIGHT.

I want my Blocs content to be placed ON TOP OF the particle animation. In other words, the particle animation should be the BACKGROUND. How do we accomplish that?
I know it’s possible because this example page puts content above the animation. Here’s a bootstrap example. I want to know how to do that in Blocs.
Hi @JDW
I don´t know anything about that code. But did you see the particles bric in the store ?
https://blocs.store/product/particles/
tom
1 Like
Thanks for the tip. Sadly, That bric won’t allow us to use a custom SVG or insert our own particles code which has our custom SVG. ![]() I want to animate a company logo via custom SVG.
I want to animate a company logo via custom SVG.
This site is where you can create your own customized animation. It’s frustrating because you cannot simply put a URL to an SVG in the appropriate field, you have to inject the SVG code (encoded). But I finally figured it out and saved the code I wanted. It is that code I am desperately trying to get to work in Blocs. But as you can see from my earlier post, it throws all content in the same Bloc to the left, with the animation displaying on the right.
It certainly would be great if the Bric you mentioned would allow us to use own own SVG.
An even bigger problem is that Particles Bric doesn’t work, except on a new, blank document. When I add it to any of my existing Blocs web pages, it won’t display when I Preview. But when I create a new document, and either color the background or color the particles (so they become visible), then it works. So clearly, that Bric doesn’t play well with other things on the page. Not that it matters, I guess. I really want to get my custom SVG animated, which is something that Bric won’t do.
Anyone can test my custom-generated Particles code (with custom SVG) in your own Blocs website simply by performing the following 2 steps:
- Open your Blocs site and click on a Bloc with a background color (so you can see the Particles on Preview), then name its ID “particles-js”.
- Copy the script below and then Paste it in the Footer of the “Add Code” section of Page Settings…
(When you Preview in Blocs, you should see your page content is thrown to the Left, and my K-shaped SVG floating around on the right. That’s BAD. What I want to happen is get that SVG animation to float BEHIND the page content. The solution to that problem is one of life’s great mysteries, I guess.)
<script type="text/javascript">
particlesJS("particles-js", {"particles":{"number":{"value":10,"density":{"enable":false,"value_area":710.2342786683108}},"color":{"value":"#daddf0"},"shape":{"type":"image","stroke":{"width":0,"color":"#000"},"polygon":{"nb_sides":4},"image":{"src":"data:image/svg+xml;utf8,<svg xmlns='http://www.w3.org/2000/svg' fill='#fff' opacity='0.2' width='50' height='50' viewBox='0 0 64.1 46.2'> %09%3Cpolygon%20points%3D%220.5%2020.1%2010.1%2014%2019.6%2020.1%2010%2026.2%22%2F%3E%20%09%3Cpolygon%20points%3D%2211.4%2027.1%2021%2021%2030.5%2027.1%2020.9%2033.2%22%2F%3E%20%09%3Cpolygon%20points%3D%2222.4%2020.2%2032%2014%2041.5%2020.1%2031.9%2026.3%22%2F%3E%20%09%3Cpolygon%20points%3D%2244.3%2020.1%2053.9%2014%2063.4%2020.1%2053.8%2026.3%22%2F%3E%20%09%3Cpolygon%20points%3D%2222.4%206.1%2032%200%2041.5%206.1%2031.9%2012.3%22%2F%3E%20%09%3Cpolygon%20points%3D%2222.4%2034.2%2032%2028.1%2041.5%2034.2%2032%2040.3%22%2F%3E%20%09%3Cpolygon%20points%3D%2210.8%2028.6%2020.4%2034.7%2020.4%2039.2%2010.8%2033%22%2F%3E%20%09%3Cpolygon%20points%3D%220%2021.6%209.5%2027.7%209.5%2032.2%200%2026.1%22%2F%3E%20%09%09%3Cpolygon%20points%3D%2221.7%2035.5%2031.2%2041.6%2031.2%2046.2%2021.7%2040%22%2F%3E%20%09%09%3Cpolygon%20points%3D%2242.3%2035.5%2032.7%2041.6%2032.7%2046.2%2042.3%2040%22%2F%3E%20%09%09%09%3Cpolygon%20points%3D%2243.5%2021.5%2053%2027.6%2053%2032.1%2043.5%2025.9%22%2F%3E%20%09%09%09%3Cpolygon%20points%3D%2264.1%2021.5%2054.6%2027.6%2054.6%2032.1%2064.1%2025.9%22%2F%3E%20%09%09%09%3Cpolygon%20points%3D%2221.6%207.5%2021.6%2011.9%2027%2015.4%2030.5%2013.2%22%2F%3E%20%09%09%09%3Cpolygon%20points%3D%2242.2%207.5%2033.3%2013.2%2036.8%2015.4%2042.2%2011.9%22%2F%3E%20%09%09%09%3Cpolygon%20points%3D%2242.2%2021.5%2033.3%2027.2%2036.9%2029.4%2042.2%2026%22%2F%3E </svg>","width":50,"height":50}},"opacity":{"value":0.07215332581736189,"random":false,"anim":{"enable":false,"speed":1,"opacity_min":0.1,"sync":false}},"size":{"value":88.18739822122009,"random":true,"anim":{"enable":false,"speed":10,"size_min":40,"sync":false}},"line_linked":{"enable":false,"distance":336.71552048102217,"color":"#ff0000","opacity":1,"width":2},"move":{"enable":true,"speed":0.5,"direction":"left","random":true,"straight":false,"out_mode":"out","bounce":false,"attract":{"enable":false,"rotateX":600,"rotateY":1200}}},"interactivity":{"detect_on":"canvas","events":{"onhover":{"enable":false,"mode":"grab"},"onclick":{"enable":false,"mode":"push"},"resize":true},"modes":{"grab":{"distance":400,"line_linked":{"opacity":1}},"bubble":{"distance":400,"size":40,"duration":2,"opacity":8,"speed":3},"repulse":{"distance":200,"duration":0.4},"push":{"particles_nb":4},"remove":{"particles_nb":2}}},"retina_detect":false});
</script>@JDW. The Particles bric is actually based on the code from the page you link too. (well the GitHub project).