I’ve been talking in this thread about how to implement search inside the Navigation bar, but I thought it best to break this related discussion into a new thread. Specifically, I wish to hear from you Blocs experts out there (including @Pealco) about how to implement a fullscreen search box as described here:
Adding the CSS and JS is easily done by way of Page Settings > Add Code > Header. I don’t have questions about that. What eludes me is how to create the “HTML” part as described in the above URL. For example, I know how to create a DIV in Blocs, but what about the “span class” mentioned in the above example?
I want to make my search bar fullscreen because I am not satisfied with what’s required to make the search bar appear over and above the navigation links. Specifically, I want to use Blocs to edit my menus, not hack around in code to edit them! That’s what led me to the above URL, wondering how to make a search bar fullscreen.
My plan is to add a magnifying glass icon to the right of my navigation bar atop the page. Clicking that magnifier icon should open a full screen search bar. When I have that implemented, I will then try to tie that search bar to Google Custom Search, which is what I use right now for search on my existing MADE IN FREEWAY non-responsive websites. I think Google Custom Search is a much better solution than Lucas’ New bric - Search because his method doesn’t involve automatic indexing, which poses a problem for large websites.
I look forward to hearing your ideas on how to implement a fullscreen search box in Blocs 3.2.1, as per the link I provided above.
@JDW
I think you edit your post after my answer, or I did´t see the exemple you give.
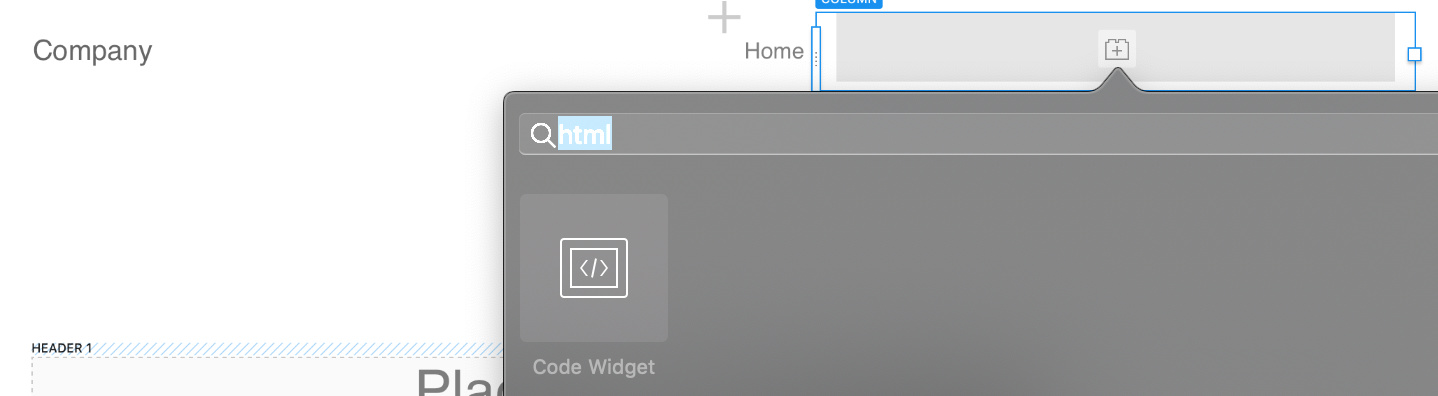
So there is the steps you need to to to implement the exemple in Blocs.
For exemple when you choose the nav Bar on the left:
Then go to the right side and select: “Include Content Area”
Then in your nav bar it will open a new place:
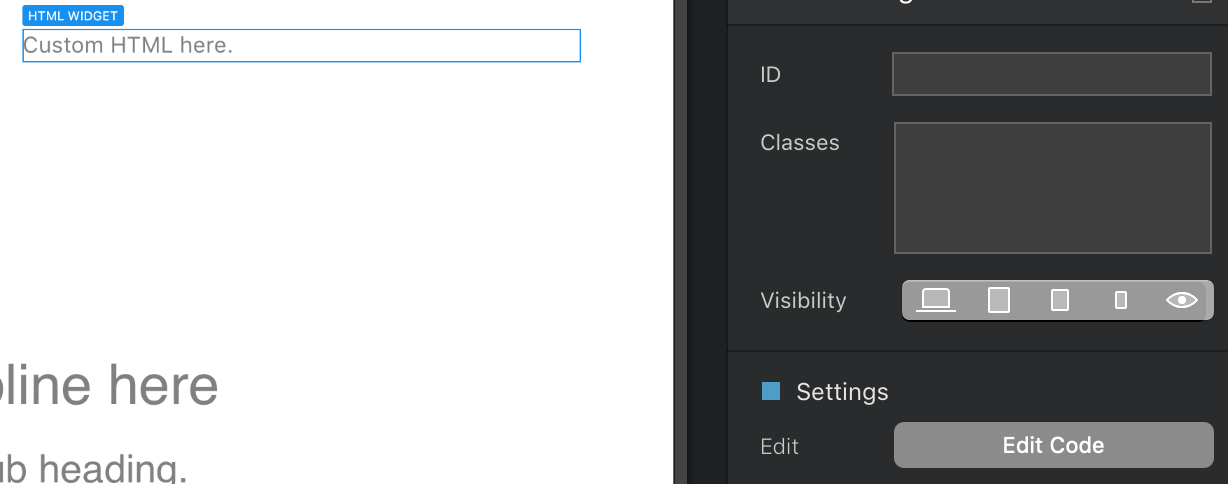
Inside that Code Widget (press it twice where it sais “Custom HTML herea” or press the button on the right side “Edit Code” and will open a code editor, then delete all that it have inside):
Open that document in Blocs 3.2.1 and then Preview in Blocs. Note the button to the right of the Navibar that says “Search.” Can you change that “Search” button to instead be a gray colored magnifying glass icon?
I am humbled and eternally grateful for your kind help, @Pealco. But I’m still not getting it to work right because I needed to edit your code (I hate code!) in order to eliminate the blue background. I don’t want the background because it doesn’t match the navi links. In other words, I want the icon to look and rollover exactly like the navi links do. So I changed the code a bit, and it’s almost perfect except that when I mouseover the icon vanishes, despite the fact I wrote “color: #ffffff” as the hover color! I tried “#FFF” too but that doesn’t work either. Here’s my updated document:
@JDW is 2:19 in Portugal, and i’m Replying from iPad, as I don’t have laptop with me right now. First in the morning I will send you the code, ok?
If you can just send me the color codes you want for normal, and the color code you want for Hoover.
Or if you want anything else, just let me know and I put it in the code as well.
I like to help, but thank you for your nice words.
The color codes I used are correct, I’m pretty sure. That’s why I’m confused the rollover color is black! Could this be yet another bug in Blocs 3.2.1??!!
Here’s my modified code:
/* Style buttons */
.btn {
  background-color: none /* No background */
  border: none; /* No borders */
  color: #C0C0C0; /* Gray text */
  padding: 4px 0px; /* Some padding */
  font-size: 18px; /* Set a font size */
  cursor: pointer; /* Mouse pointer on hover */
}

/* Mouse-over */
.btn:hover {
  color: #ffffff
}
Again, it looks fine in the normal state, but when I mouseover, the icon turns black. It should be white (#ffffff). I even tried #FFF but it’s still black on mouseover.
@JDW, think of a span as a div inside a div. It will inherit all the rules of the outer div unless those same rules are applied in a different way inside the span. In addition, you can create different rules to affect only what’s within the span tag. (hence the reason for a span tag). Give your span a class name, as shown in the example you linked to and you can create a class in Blocs and style as usual. You can style any class name in your project. That can include classes you’ve created/embedded into HTML widgets, classes that are part of Bootstrap 4 and classes added another way. If you know the class name, you can target it and affect it using the Blocs class manager. Hope that helps.
PS: Another thing you may want to look into is attaching an external CSS stylesheet to your project. I’ve become accustomed to doing that with every project, because there’s always things I can’t reach with Blocs. One reason for that is that if you’re trying to override a Bootstrap class for example, you’ll need to write CSS and apply the ‘!important’ rule in order to accomplish that. I also use the external CSS to affect targeted ID’s and Classes at breakpoints not offered natively inside Blocs. Another example of why you’ll want to use an external CSS is for things like z-index and positioning (ie: ‘absolute’, ‘fixed’ or ‘relative’) You can’t get at these within Blocs.) z-index becomes crucial when you start doing things like overlapping Blocs such as for floating text or images over another bloc, or creating multiple headers.
Finally, I’d highly recommend getting familiar with the ‘Inspect Element’ tool in Chrome (and similar ones in other browsers). It allows you to inspect any element on a page and determine it’s id’s and class names, so you can target them with CSS. There are plenty of YouTube videos covering that. I hope I didn’t cover more than you were wanting to know in response to your post, but those are some things that just occured to me as I answered your post and things I thought you may find helpful, either for this current behavior you’re trying to achieve, or something in the future. Good luck!
Thank you for the detailed tips. I must say though that I’ve built websites since 1999 exclusively using SoftPress Freeway, and I’ve yet to become a web coder. Blocs appeals to me like Freeway did back in 1999 by targeting people “who don’t see the world as code.” Indeed, if I must deal with a lot of code, I might as well become a web coder and do everything in BBEDIT. (Some people do just that, even to this very day.) But to me, code consumes my mind to such an extent that it’s a cup of ice cold water poured over my creativity. I use only one side of my brain at a time. Coding is Left, creative design is Right. I want to focus on the Right brain when it comes to web design.
I see you are savvy on this topic of code, so let’s talk specifics. Please download my Blocs 3.2.1 document below, preview in Blocs 3.2.1, then mouseover the little magnifying glass icon at the right of the navibar, and then, if you can, please explain why it turns black even though the code specifies white (#ffffff).
I downloaded it but it was missing 4 resources. I tried previewing it anyway but it wouldn’t preview without any resources. Not sure why. If you want to update and resend, I’ll try again…
I’ve added a feature request to Wish List that addresses that bothersome problem.
Oh how I hate and despise web code! This is a prime example of why I hate it. That “!important” is not always necessary to add in the CSS, yet it is this time. I just added it, along with the semi-colon, and it works. (It doesn’t work with only the semi-colon added.)
I consider a GUI more powerful than code hacks because a GUI doesn’t rely on (1) a full understanding of code, or (2) a good memory that must remember all the little intricacies of code. I wish I could just use the Blocs GUI to add a Navigation Block that had a logo on the left and a magnifier at the far right and it would JustWORK™.
Anyway, thank you @Pealco for reminding me of how important “important!;” is in code. THANK YOU!
I can’t understand how to use 2 Code Widgets properly. You see, I need two widgets to display my Search Icon across all the breakpoints. Here’s my Blocs 3.2.2 document:
Everything looks great in the LG breakpoint. My menu system looks good, works fine, and the search icon looks good and works fine. But I am pulling out my hair trying to get all that content to display properly in the other breakpoints.
As you can see in my document, “Bloc #main-navi” contains 2 Rows. The top Row displays in LG, and the lower Row only displays in the other breakpoints (MD, SM, XS). I want a search icon to appear in all the breakpoints, which means I must use more than 1 code widget. PROBLEM#1: I want to make the search icon larger in the MD and SM breakpoint, but when I change font size, that size affects the LG breakpoint too! So I’m pulling out my hair about how to fix this. Would you know?
PROBLEM#2: The Search Icon only works in LG for some reason. When I click it in the other breakpoints the search field does not display. Do you know how to fix that?
Hello @JDW, I create an alternative to your contents, and I think everything is fixed now… try it.
The problem was: even when the contents are hidden they are there, so there is a problem with duplicated content.
The icon is still the same size in all breakpoints, so PROBLEM#1 (in my previous post) is not solved, but I will live with it because I still have so much more work to do fixing my dropdown in all the smaller screen breakpoints (it’s hell, actually). You fixed PROBLEM#2 perfectly though! Thank you for your kindness. I really appreciate it!
@Pealco You have been a huge help to me in this forum. You also have been kind to me in other threads when people were giving me a verbal beating. I hope there is a time I can return the favor. For now I will teach you your first word in Japanese …
Those Japanese characters are called “Hiragana” and there are 46 of them. If only Japanese were that simple! But it’s not. There are Kanji too (Chinese characters) – about 2100 of them! You can actually transform the hiragana word ありがとう into Kanji: 有り難う. It means the same and reads the same.
Sorry for being off-topic, but sometimes it is fun to talk about language.
Take care, my friend!
Hello @JDW
I think you can change the code of the button to achieve what you saying by this way:
.btn {
  background-color: none /* No background */
  border: none; /* No borders */
  color: #C0C0C0; /* Gray text */
  padding: 1px 0px; /* Some padding */
  font-size: 2vh;  /* Set a font size */
  cursor: pointer; /* Mouse pointer on hover */
}
Change that part of code in the widget.
So in the end you change px to vh and then adjust according your needs:
vh is equal to 1/100 of the viewport height. So for example if the height of the browser is 900px , 1vh is equivalent to 9px and, similarly, if the viewport width is 750px , 1vw is equivalent to 7.5px .
But as you working inside a widget/column the size of the browser you have to change to the size of the working area you are working.
Thank you for my first word… I just don’t know how to write it…